The Yocto drum machine
2023-12-09
In 2016 I built a Yocto drum machine from a DIY kit for myself. This was my first electronics DIY project and it also became my first embedded development project when I wrote my own firmware for the machine. In this post I will talk about what the Yocto is, my experiences and what I learned from working on it.

A TR-808 clone
The Yocto is a DIY clone of the Roland TR-808 made by the small company e-licktronic. This is what the original 808 looks like:
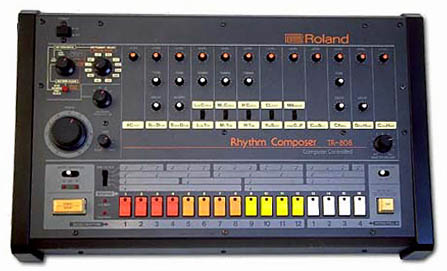
Source: Wikipedia
The Roland TR-808 Rythm Composer was a drum machine (or "drum computer") from 1980 that had evolved from earlier preset rythm machines made by Roland. These music gadgets were meant to be used by organ players to provide a drum track so that a lone organ player could act as a one-mand band. In this video you can see Don Lewis, who was a design consultant for the TR-808, demonstrating what that would look like.
The 808 was a commercial failure but it ended up becoming popular in underground music genres like hiphop. When those genres became mainstream the 808 became a sought-after instrument after all, well after it was discontinued by the manufacturer. It is a running joke in the synthesizer community that Roland refuses to put its incredibly popular old models back in production and this also applies to the 808. This is why DIY clones such as the Yocto exist.
What does it mean to build a DIY kit?
Most DIY projects I've worked on as a builder consisted of the following:
- A set of 1 or more circuit boards that form the heart of the project
- A "Bill of Materials" (BOM): a shopping list for all the parts that go on the circuit boards
- A kit of rare parts that are hard to get by, if any
- A build guide with instructions for assembly, calibration and testing
- Schematics of the circuit boards
- An online forum or discussion board where builders can ask questions and help each other
- An enclosure for the finished project
All items above except the circuit boards are optional and depend on the project. The circuit boards + bill of materials are probably the minimum.
To build something like this, I end up doing the following:
- Read through all the existing discussion on the project forum. This is a lot of work but it teaches you what to look out for, and whether people who built the kit before you are happy with it or not.
- Hours of tedious online shopping at sites like Mouser or Digikey to buy all the parts that make up the bill of materials. Some parts will be hard to find.
- Soldering all the parts (about 2000 in the case of the Yocto?) onto the circuit boards.
- Find out that the thing is not working or only half-working.
- Become an electronics repair person and fix your own build. Spend hours reading the service manual of the device, trying to understand how it is supposed to work.
- Finish the build and enjoy the fruits of your labour (e.g. make music with it).
All in all this is very time consuming and you should only do it if you enjoy the work itself. If you have to pay someone else to build a DIY kit for you it is usually cheaper to build a non-DIY version of the product instead, because the amount of labour required is so high.
The Yocto as a DIY electronics project
I think the Yocto was a very well-supported project considering its complexity and that it appeared to have a 1-person company behind it. It was very popular at the time so there was an active community of online builders who were helping each other.
For me it was a great adventure because it was my first big DIY electronics project (I had done one project before it of less than 100 parts). I had very little idea what I was doing and it was very rewarding to make it through to the end. I had to fix quite a few mistakes in my build but that was also fun for me.
Firmware
The TR-808 used analog synthesis (12 different sounding circuits) to produce its sounds. The sounds were triggered by a microprocessor. The Yocto recreates the analog synthesis circuits but uses a modern MPU: an ATmega1284P. It combines the original analog synthesis with a new digital brain.
The source code for the MPU of the Yocto was available on GitHub as an Arduino project. Because it had some bugs, and because I am a programmer, I started tinkering with this firmware. Eventually I replaced it with my own.
This was the first I worked with the Arduino platform. Arduino is a software platform that lets you write code for microcontrollers using abstractions that decouple your code from the actual device it runs on. These abstractions were a headache for me because I had to learn both what a microcontroller is and how it works, and how Arduino renames and abstracts everything.
The source of truth for what the microcontroller can do is the datasheet provided by the manufacturer. This describes the capabilities of the hardware and how to use these capabilities in your software. Annoyingly, Arduino renames all the terms used in the datasheet. To make things worse, real code (like that of the original Yocto firmware) mixes the names of the Arduino world and of the manufacturer.
It was an immense relief for me to discover avr-libc, which is the software layer that Arduino is built on and tries to hide. The terms used by avr-libc match those of the manufacturer! As an added bonus, you can use the avr-libc toolchain from your editor of choice instead of being stuck inside the Arduino IDE.
Before I discovered avr-libc I even went through the trouble of creating Docker images to compile Arduino projects in CI. Because it is all supposed to be used from a graphical IDE, this was not straightforward. In contrast with avr-libc I only need to install some commonly available Debian packages and I can compile the whole thing using a Makefile.
Conclusion
My goal at the start of building my Yocto was to be able to use the sounds of the TR-808 in my own music. I had no idea that I would end up reading so many circuit diagrams and programming a microcontroller. It was a very positive and affirming experience to find out that I can apply my problem solving skills in a domain I know so little about (electronics) and that I could learn to write programs in a very different environment (embedded devices) from what I'm used to. Finally, I have grown a lot more appreciative of open source toolchains (in this case avr-gcc) as an escape hatch from inscrutable vendor software (the Arduino ecosystem).